Thursday, 27 June 2013

Moxxi Part 6 - Patches, Patches, Patches

Miss Moxxi!
The beautiful, the barbaric, the most buxom!
Since I don't think I actually addressed this yet, I figured I'd chat a bit about why I chose the Borderlands 2 version of Moxxi for my first cosplay.  First, because I'm an idiot and looked at her thinking "Well, that doesn't look too complicated" - yeah, famous last words of many many cosplayers. Also, her costume design is awesome, quirky, and beautiful all at the same time! Anyway, I specifically chose the Borderlands 2 version not only because she was the most recent, but also because she had a much more significant role in the second game.  Don't get me wrong, I LOVE her in the Underdome (now that the statute of limitations has worn off following actually playing through the entirety of all the stages), but it was nice getting more Moxxi - especially in Mr. Torgue's Campaign of Carnage.  I freaking love that ENTIRE add on. Heh heh... "I CAN USE INNUENDO TOO. TONIGHT'S FIGHT IS BETWEEN FLYBOY AND THE VAULT HUNTER...BLOWJOBS!" *cough/giggle/snort* So Moxxi in Borderlands 2 = extra badass.  That, and I look good in purple.  Anyway, back to the matter at hand...

Moxxi's Patches
Three of five...
I fail again.  I promised buckles, but I ran out of time and had to take off for my summer contract before I could take pictures of the buckle system. Luckily, I have something I CAN address - so just like Moxxi herself, Moxxi's jacket was designed to show that it's taken a little wear over the years, and as such there were more than a few patches to make! Overlooking the fact that her purple jacket has patches in the exact same places as her red one (consistent wear?), I wanted them to be as exact as possible. In addition to the large design on her back, there are four patches of various shapes and sizes that I needed - here's how!

Materials needed:
-White paintable fabric (I used yet more of the light denim I bought for the spats)
-Fusible interfacing
-Fabric paint (I used the 3D kind for the large patch, acrylic paint and fabric medium for the rest)
-White thread

First, the design on Moxxi's back.  It took a little effort to understand and sketch out the back patch in order to get the proper proportions for the design. I worked on paper until I had it fully figured out, then moved on to fabric.  I've broken in down in illustration for anyone who may follow in my footsteps:
The Design from Moxxi's Back Patch
Trippy, I know.
I found it least complicated looking at it as a square rather than a diamond, so I worked out the design in that orientation. Basically, the blue lines form a chunky cross, then the curvy green and purple lines are drawn from inside a corner through the outside corner, and to the corner of the box. This is also the same design (though a little squished) used on her belt buckle.
The Back Patch in Progress

A Palette of Blues
Bluey!
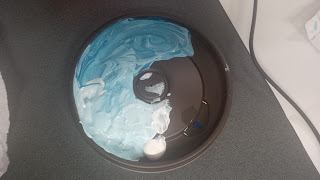
I sketched the design out in pencil directly on the fabric (as I knew I was going to be painting over it completely) then mixed up some paint in a slow gradient from white to blue so I would be able to make varying shades for the different sections.  The design itself looks like it's supposed to be shiny (with the different portions being different facets), but I just painted it as I saw it, with each section in varying shades of blue, and with a swatch of lighter "shine" through the center panel. Once all the colours were in place, I painted in the black lines to separate them, and added a black border around the outside of the design.

Moxxi's Back Patch - finished!
Not bad... My mantra became "It was just drawn that way"
What I learned from the first patch: it's much easier to make the patch first, THEN paint it. With the black going out beyond the edges of the patch area, it was difficult to shape/fold/sew the edges due to the stiffness and thickness of the paint.  Also, I ended up making it too large (in the name of "accuracy") at 15 x 15 cm or so.  Next time, I'd keep it to 12 cm or so.  Anyway, to turn the fabric into a patch, excess was trimmed, it was folded in at the edge, then fusible interfacing was sewn onto the back at the same time as sewing down the edges.  I ironed the patch directly on to the jacket, then tacked the corners down with hand stitching just in case the glue let go.  Once it was on, I painted around the edges of the patch to blend it into the jacket, and to add the "X" patterns heading out from the sides of the patch.

More Patches!
Back and Front
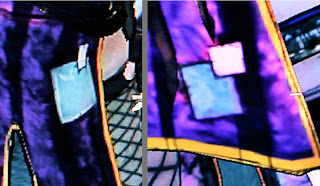
The other four patches (seen in two groupings of two) on the front and back of her jacket, were made before painting to avoid the above issues. I had originally considered making them out of fabric that matched the colour of the patch and leaving it at that, but making custom painted items to match the in-game design becomes really addicting really quickly. Just sayin'!  These too, ended up a little larger than the design called for, but worked out well enough for my tastes. Simple enough to make, cut out with 1cm seam allowance on all sides, fold under and pin on top of fusible interfacing of exact size, and sew around the outside - done!

Finished patches!
Forgot to add these at first - oops! Final product!
The interesting part was actually painting - I wanted them to be true to form, so I went in game again to get a close look at the patches - and needed to work straight from the game because photos seemed to muck up the colour too much to work from.  The patches are all different colours (pinks and blues) with variations/gradients and a black border.  By the time I got to this set of patches, I had discovered acrylic fabric medium by this point, so I was able to work with acrylics, and again, just painted them as I saw them.  Once they were dry, I ironed them in place one by one (actually, this is where I burned the hot glue from one of the ends of the tail wire! Oops.) and tacked each corner down using good old fashioned hand stitching.

Et voila! The jacket was patched up and ready to go! Because I'm away from home (and the ability to take any pictures) I won't make any promises on what will come next or when, but if I was committed enough to make the darn costumes (and you're committed enough to read about it) I WILL get all the details posted sooner or later! Come on, someone needs to know my pain!

My Moxxi-tacular Cosplay tutorials so far:
Part 1 - Spats
Part 2 - Finding Fabric and Starting the Jacket
Part 3 - Jacket continued, Stripes and Zipper
Part 4 - Cuffs and Collar
Part 5 - Buttons

Wednesday, 19 June 2013

Moxxi Part 5 - For the love of Buttons

Once again I seem to have lied.  I meant to post about the bias tape, rick rack and tails, but again, I didn't have the time to get the pictures together.  Now I know it probably doesn't matter to anyone, but I must say I was entertained to notice that there have actually been people reading my blog - over a hundred pageviews from as far away as France, Russia, Holland and China! That probably doesn't mean much in internets land, but it's nice to know I'm not "playing" to an empty house.  Anyway, this DID take place before the bias tape went on, so I guess it's fitting!

Paper Placeholders
Looks about right! Except the paper bit...
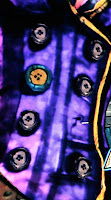
Oh the buttons... I looked SO hard for buttons that were even "close" to what I wanted.  Essentially, there are 11 buttons on the jacket - 10 smaller black buttons (plus 8 if you're using the same ones for the spats) and one huge yellow/turquoise one. My first step was figuring out the approximate size I would need, which I did by cutting out various sized circles of paper and trying them out on my (at the time very unfinished) jacket to see if the size looked "right." The sizes I ended up deciding I needed were approx 30 mm for the small buttons and approx 40 mm for the large button.  Obviously I tried the local fabric stores first, but everything was either too small, looked wrong, and in any case even next best thing options would have run me about $2 a piece, which I was NOT willing to pay.

So I took to the internets! I searched both ebay and Etsy for round, wooden buttons (easily paintable) in the size ranges I needed, and found a couple of promising options... all of which were in Singapore, China, or Hong Kong, and not likely to arrive until AFTER con (unless I was willing to pay through the nose for express shipping which still wasn't a guarantee). I was crushed. What in the world was I going to do? How would I find a local source with EXACTLY what I wanted, or how low were my standards going to have to drop if I didn't?  Hang on, the only way to get EXACTLY what I want is always the same - make it! In this case, out of polymer clay!


Moxxi's Buttons!
Buttons!
Materials needed:
-Polymer clay (fimo, sculpley, whatever!)
-Acrylic paints
-Gloss varnish for acrylic paints
-Circular objects of varying sizes
-Toothpicks
-Aluminum foil
-Baking sheet


Circular objects for buttonmaking
Any circular thing I could find...
For someone who has never worked polymer clay before, this may be annoying/nigh impossible, but the goal was to make 10 identical 30 mm or so buttons, and one 40 mm one.  I started by rounding up every small circuilar object I could find to make the impressions in the middles of the buttons.  As I wasn't certain what size I would need, I had a whole collection on the counter when I got the process underway. 


Making of a button
Smoosh and poke!
Next I worked the clay to make it malleable. This can be a time consuming process, as the clay is pretty hard and crumbly to start (especially as this clay had been sitting around my craft box for two years or so), but bit by bit it warmed up, and once it stopped cracking, I knew it was ready to rock!  I made the large button first, starting by smooshing a decent amount of the clay into a generally circular shape on the counter, rolling it back into a circular shape, smooshing it down and repeating until it was the right diameter. From there, I smooshed a circular object of the right size into the center to create the raised perimeter, then removed the object (old film cannister) and smoothed out the perimiter - repeating the smooshing and smoothing as necessary to get the button as "perfect" as possible. When I was happy with the result, I used a toothpick to make the holes (four holes) and laid the button on an aluminum foil lined baking sheet to wait for the rest!


Failed button smoosh
Smooooooosh! Oops.
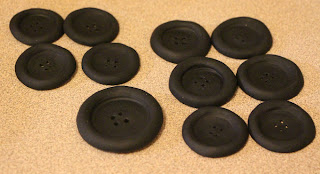
Because I wanted the other 10 buttons to be as even in size as possible, I took the remaining poly clay and rolled it into a log, flattening off both ends to make it a cylinder with even diameter along the length. I chopped in in half, then chopped it into as-close-to-even fifths as possible. Of course they weren't perfectly even, but I did my best and in the end, a little bit of unevenness is fine - maybe I was just drawn that way!

My first attempt on the smaller buttons was rolling the clay into a ball, then smooshing to make it smoosh out evenly.  This was a bad idea, and the ball cracked. Just sayin'.  What actually worked was smooshing, smoothing, and flattening, but I made this picture illustrating each of the six stages to SHOW how it worked:
The button making process!
Step one: The original disc from the cut outs
Step two: Smoosh inwards to build up the "perimeter" of the button
Step three: Smoosh the center to flatten it out and raise the perimeter further
Step four: Flatten the center with a small circular object, then smooth the perimeter
Step five: Flatten the center further with a circular object of the exact desired size
Step six: Poke four holes with toothpick

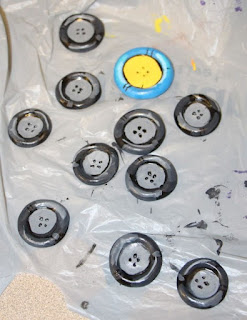
Baked polymer clay buttons, pre-painting!
Oven fresh, mmmmmmmMmmmmm

Moxxi's buttons, finished!
Soooooooo perfect!
There was a lot of smooshing and smoothing involved, and eventually it worked out. Once all the buttons were in shape, I laid them out in the aluminum foil lined baking sheet, then baked them following the instructions on the package from my polymer clay. After cooling, I painted them all using my reference pictures as a guide, and applied gloss when dry to finish the look. Check out those damn buttons! $20 + for store bought, not quite right buttons, or $3 for a pack of poly clay to make perfect freaking buttons? It'll be the poly clay every time!

Now, I may have mentioned once or twice that I might have gone a little overboard when it came to accuracy.  Well, attaching the buttons was one of those places - if you look at Moxxi, there is NO thread on the buttons, and once I noticed that, the little X marks on the Moxxi cosplays I looked at bugged me greatly.  I vowed - no X for me!  The solution: I sewed (actually, Fatima did) on leftover buttons from the spats (I had bought a huge box of assorted buttons for the sake of not having to spend a fortune on individual packs) on where I wanted them, then used hot glue to attach the polymer clay buttons to the space holders - no strings necessary! 

Well... I screwed up twice in that process.  First, I didn't take the time to properly gauge where the buttons needed to go - attaching them was a last night, last minute gotta-get-it-done task, and I just grabbed the jacket and drew on approximate X marks for Fatima without taking the time to put the jacket on and make sure they were right.  I ended up making the pattern too large, and had two of my buttons so low the belt was above them - easy fix for next wear, but after all the effort I put in to accuracy I was a little embarrased by the gaffe.  Second, hot glue was NOT the right choice for attaching them (I will be using e6000 or super glue in the future).  I started losing buttons before I was even out the door, and nearly lost my prize huge blue and yellow button several times over the course of the convention.  At final count, I need to re-make four of the ten small buttons (three cuff and one of the below the belt) before next wear. Oh well, I'll make the ones for the spats at the same time, and then all my buttons will be the same! Success!

The buttons were a triumph! With those complete, all the jacket was missing was patches and bias tape. That said, I've been neglecting my Dr. Zed posting, so next time, we'll be talking buckles!

Need more Moxxi? My tutorials so far:
Part 1 - Spats
Part 2 - Finding Fabric and Starting the Jacket
Part 3 - Jacket continued, Stripes and Zipper
Part 4 - Cuffs and Collar

Tuesday, 11 June 2013

Moxxi Part 4 - Cuffs and Collar!

Gaige's Character Design
So much fun, right?
Ladies and gentlemen, I came very close to doing something silly yesterday.  It probably would have worked out well enough, but I considered putting in an offer to take a commission.  Beyond the fact that I'm extremely new to the cosplay scene, I doubt I would have had the time to make it without adding considerable stress to my schedule, but she was looking for a Gaige cosplay (which I have wanted to make but don't have an occasion to wear) in pretty well my size (so I could check the fit), and I sooooooo wanted to make it!  Oh well, one day I may have the time, skills, efficiency, precision and confidence to do commissions, but at the moment, not so much!  That said, there may be a Gaige inspired top somewhere in my future - I just love Borderlands character designs... and just about everything else about the game(s) for that matter!

So, I had been planning on talking about the bias tape and such in this post, but since I didn't take pictures at the time, I was planning on doing a little mock-up for this and that to make sure I can get my point across accurately. So instead, I'll write all about the cuffs and collar!
Moxxi's Cuffs and Collar
Today's targets...
Materials needed:

Cuffs -
- Black and white striped fabric
- Medium weight fusible interfacing
- Fabric paint (blue and white)
- Black fabric marker

Collar -
- White fabric (I used the same lightweight denim as in the spats)
- Heavy weight fusible interfacing
- Painter's tape
- Fabric paint (for the collar I used acrylic fabric medium, and acrylic paints - black, blue, and white)


Cuffs ready to go!
Paper cuff, fabric cuffs!
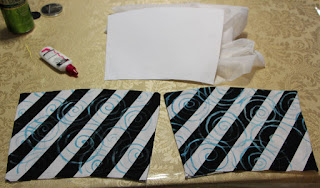
The cuffs were relatively straightforward. I made my own pattern using printer paper - I wrapped it around my wrist and determined (based on the reference pictures) what the dimensions needed to be. So as not to have to deal with the cuff being able to open and close, I made sure the paper cuff was large enough to be pulled over my hand when closed. The paper cuff became my pattern, and I added the seam allowances while tracing it on to the fabric. Because I slanted the pattern to make it curve and give the overlap/space, I needed two "fronts" and two"backs" with the interfacing in between. When sewing them together, I came close to messing up and sewing the interfacing between them (durr...) - the two "out" sides need to touch, and the interfacing goes on top of either. Once it was sewn together, I flipped it right side out, and ironed it to fuse the interfacing inside and stiffen the cuff.  I think I used a lighter weight than I needed, but it worked out - that said, I got a much heavier weight for the collar.
Failed fabric marker
Fabric marker - no use on black!

I used fabric paint for the swirls (you can see the little tube of tulip in the picture) mixing white and blue. I'm mostly happy with how they turned out, they're just sketchy enough, but still have presence - that said, the thickness of the paint made it difficult to keep the swirls even in colour.  I also experimented with blue fabric marker, but it didn't show up on the black parts at all.  Once I discovered the fabric medium, I knew acrylics would have done a better job, and that is what I ended up using on the collar.
Attaching Moxxi's Cuffs

Attaching the cuffs to the sleeves took way more brain power than I had to give the day I did it... It was one of those days where I was just exhausted and should have been in bed, but instead, I was determined to get that one last thing done, and found myself sitting at my sewing table thinking "If I put it like this, then flip it... wait... If it's like this while inside out then... no... wait..."  ...serious issues trying to think. Anyway, what actually DID work is - I turned the jacket inside out, then pinned the cuff on with the outside facing outward, and sewed it as though it were an extension of the sleeve. I also took care to ensure that the opening (where the cuff comes together when flipped) faced away from the body with the front overlapping the back, then sewed the cuff closed to the point as shown in the references.
Moxxi Collar Pattern
I think it looked like this!


Cutting out the collar
Making sure the two sides match...
The collar was based off of the collar from the original pattern, modified to account for the shape, both on the outside and inside of the collar - the bust line was adjusted to give the appropriate show of cleavage, so I brought the inside in a little, and adjusted the outside to give the right shape. The tips of the collar are quite long, which I accommodated for, but I ended up making the back of the collar too wide. Oops.  I knew pretty quickly that using the same striped fabric as the collars wouldn't be effective, as they're straight all the way around, and the stripy fabric would be random angles once in collar shape. Instead, I used the white denim I had made the spats out of, and painted the stripes on in accordance with the references - but that was only after putting it together. Same as the cuffs, I had a front, a back and the interfacing - as mentioned before, heavyweight, to stiffen the collar and allow it to stand up a bit. Once I had everything  together, I flipped it right side out and ironed it to activate the fusible interfacing.
Collar taped for painting
Sketch it on, tape it up, and paint, paint, paint!


Moxxi's Collar and Cuffs
Swirls in place and ready to go - I like collar's better than cuffs
I used pencil directly on the bottom side to sketch out the lines, and it took a little experimentation before I had a working pattern.  When they were in place, I taped over the "whites" and the  collar was ready for painting!  I mixed up a batch of black fabric paint using the acrylics and fabric medium (mixed 1 to 1) and got to work painting in the stripes. It took a few layers in certain areas, but I kept going all around to ensure a nice even black. After allowing all of the paint to dry and removing the painter's tape, I used the white and blue acrylic paint with fabric medium to paint the swirls.  The thinner paint made for much easier swirl painting, and more even swirls, then allowed them to dry again. I turned the jacket inside out, pinned the collar (right side facing in toward the liner) in place and sewed it on. While it looked comically large at first, with a little shaping and the rest of the costume in place, it was just about perfect!
Attaching Moxxi's Collar
Swirls touching liner, pin in place, and sew on!
Next time, I really WILL cover the bias tape, rick rack, and tail curling... Or at least I think I will?

Miss anything? Moxxi Tutorials so far:
Part 1 - Spats
Part 2 - Finding Fabric and Starting the Jacket
Part 3 - Jacket continued, Stripes and Zipper

Saturday, 8 June 2013

Moxxi Part 3 - Jacket Continued - Stripes and Zipper!

My lonely sewing machine, finally back to work!
Today was a important day - my first time back to sewing after finishing our costumes! Nothing exciting, just sewing blackout lining into our bedroom curtains, but it took me a little while to feel like getting around to it after spending so many days in a row doing nothing else, but I watched me some Harry Potter, picked out some seams, cut, pinned, and finally sewed myself some blackout curtains.  It was an easy job, but it went well, and it felt good to have a little success! 


Gloss varnish, you sweet saviour you!
With the jacket outer all put together, shaped to the right shape, and fitting snugly, it was time to paint me some stripes!  It took a lot of experimentation (on fabric scraps, of course) to find a formula that would work for the stripes, giving a nice darker purple without overriding the pattern, bleeding, or turning the stripes black.  My first attempt involved a freakin' $8 bottle of purple fabric paint that (in spite of the "matte" on the bottle) was full of little purple sparkles.  Likely lovely on a shirt, not so much for adding dark purple stripes to a purple jacket.  I tried various mixtures of blue, red, and black fabric paint with more or less water, also fail, they all ran in spite of the painters tape there to seal them in. Finding fabric medium for acrylic paint helped, but still, even with acrylics, it was too thick, too dark - the secret ingredient? Gloss.


The desired effect
Materials needed:
-Blue acrylic paint
-Red acrylic paint
-Acrylic fabric medium
-Gloss varnish for acrylic paint
-Painter's tape (various sizes for convenience)
-Paint brushes, mixing tray, water tray
-Black fabric marker (for liner)
 And once all of that is dry...
-Separable purple dress weight zipper (I needed 14 inch)

So, ladies and gentlemen, the magic working formula was approximately 30% red acrylic paint, 30% blue acrylic paint, 25% fabric medium and 15% gloss.  My advice if you plan to try this at home, play around a little, see what works for your fabric (let it dry and all) and then when you're ready to paint, make a whole ton of it.  Seriously, a lot. You don't want to run out and end up changing the formula in the middle of painting your stripes!


It may not look pretty, but it worked!
To prep my jacket for painting (outer only) I started by ironing the jacket to make it nice and smooth.  Then I grabbed my laptop for all my reference photos, and went to work carefully taping out the areas I did not want painted - which made a stencil for the pattern as seen in game. Some of the stripes are pretty close together, so where the space was thinner than the tape, I ripped (or cut) tape in half and used that to make the right pattern.  I did my absolute best to make sure my tape strips are as straight as possible, and really pressed the tape into the fabric to make sure it sealed the paint in between the tape (not letting it bleed under).


So much purple paint - but so worth it!
Once all the tape was in place, I prepped my painting studio (read: balcony).  I spread a "doesn't matter if it gets soaked with paint" vynil tablecloth across my balcony table, and used little weights from my adjustable dumbell set to weigh down the corners.  In order to protect against bleed through, I placed the jacket over a dry cleaning bag on a hangar, and stuffed the sleeves with plastic bags. Finally, I mixed up a huge batch of my paint using my award winning formula! With everything in place it was time to paint. After working a nice thick layer of paint into the first stripe, I lifted a little bit of the tape from beside it to ensure that it was working right, and sure enough, perfect, straight, and just the right shade of purple - I was so stoked! So I went crazy and carried on with the rest, adding a second coat wherever it looked like it could use it then let it dry.
So perfect <3
Once the paint was well dried (I admit being a little impatient, but had to wait, wait, wait) I carefully peeled off the tape. It's best to peel away from the centre, as I learned, and I frayed a few edges where I wasn't careful. I couldn't be happier with how the stripes turned out! They're freakin' perfect (or as close to as possible) and looked just right to me - I recall doing a happy dance at this point!


With the outer all finished, I needed to take care of the design on the lining - specifically, on the tails. If you look closely, the under side of the tails has a diamond pattern on it, as though it's quilted. I REALLY didn't have the time by this point to sew it into place, so I drew it on all quick and sketchy-like with fabric marker, adding a little cell shading here and there as necessary. Easy peasy!  If I had had more time, I may have taken it a little farther, but in the pictures, the effect was just about perfect!


It turned out something like this!

With the inner and outer of the jacket ready to roll, I pinned the zipper with Fatima's assistance to ensure proper fit and function.  I had decided early on to not make the buttons "functional" as a zipper was sure to give a smoother, tighter closure than buttons could. I used a 14 inch dress weight separable zipper.

The toggle half was installed along the seam between the spare center flap and the front side panel, and the other half was pinned on the edge of the flap (It was actually sewed on along with the bias tape in the next step - we just pinned it at this point to make sure the fit was right). I guess I could have installed the toggle half during the original jacket construction, but I just sewed it on after the fact - it worked out just fine!

Next time bias tape, rick rack and coat hangars!  Stay tuned!

Moxxi tutorials so far:
Part 1 - Spats
Part 2 - Fabric Shopping and Starting the Jacket

Friday, 7 June 2013

Moxxi Part 2 - Fabric Shopping and Starting the Jacket

With Julian's costume mostly together, it was time to get to work on the hard part - my Moxxi jacket. Right from the start it was fraught with difficulties, from issues with the pattern, to not finding satisfactory fabric, there was just nothing going for me.

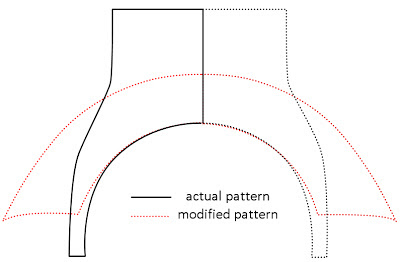
I picked up the pattern ages before, I think it was the first thing I bought for the whole project.  Keeping in mind the last time I worked with a pattern was over 13 years ago, and that one was supplied by my school, you can say I was a little out of practice.  What I didn't pay attention to, is the fact that the sizing is way out of line with the messed up vanity sizing available in stores - I wear a size 8/9, so I grabbed the size 6-14 pattern... So problem #1, according to the pattern, I should be a size 16.  In the end it wasn't a huge deal, I added a little more seam allowance all around, and ended up taking it back in again, but I didn't want it to go the other way, so I would say it was worth it.  The second issue was with the pattern itself - while all the little pictures on the package looked like little dresses (one whole piece), in fact they were spaghetti strap dresses with a little bolero jacket that goes over top!
The pattern I modified for Moxxi's Jacket
How perfect is th....  Aww, sneaky buggers!
Moxxi's fabric up close
Hibiscus... Or.. Floral, anyway?
For fabric, I went with a very specific picture in mind - Moxxi's jacket is made with a purple hibiscus flower patterened fabric which looks somewhat shiny, and has darker purple stripes.  Obviously, I wasn't going to find EXACTLY that... but I wanted to be somewhat close. I searched every fabric store I could find, including going through the million little sample books at Rockland Textiles (which turned out to be futile because I only needed 2 m, and the minimum order was 10 m - I was NOT ordering $300 worth of fabric for the 2 m I need), nothing doing.


The fabric I used for Moxxi's jacket
Close enough!
My standards dropped bit by bit, but after hours of searching, no luck - so I went to the internets! Many searches on many sites later, I finally found two different fabrics, both floral patterned satin brocades, which would work - one which was a little too red, and the other a little too blue.  So I went in game to the only place you see Moxxi NOT under red fluorescents (when you rescue her from Pyro Pete) and she's indeed closer to the blue end of the spectrum than the red, and I went with 2 m of this lovely purple satin brocade from PsychadelicPinup on Etsy, which ran me $25 US with the shipping.

With pattern and fabric finally in place, it was time to get to work!

Materials needed:
-Purple (or red) fabric, in hibiscus pattern, if that even exists ;)
-Pink (or yellow) lining fabric
-Purple thread

First things first, I decided from the start that I wasn't going to bother with a liner, because I didn't want the extra work.  For the record, I am an idiot. A liner is pretty much a must, especially when working with a fabric like satin brocade which frays out like it's nobodys business.  It makes the garment smoother looking, feel better, and seals the insides inside.  If you're going to make a liner (DO IT), do it right at the beginning, cut it out at the same time as you cut out the rest, don't shortcut, it makes your life harder later. Now that we have that established, we'll cover what I did.
Pattern Modifications
Give or take, the lower potion of the jacket.
The shell of the jacket
Not perfect, but close enough!
As mentioned earlier, instead of being one piece, the pattern I selected had a dress with spaghetti straps and a bubble skirt with a bolero jacket.  Instead, I started by making the jacket as directed, but leaving out the facing, liner, and collar.  Next I made the midsection of the dress, extending each of the 7 panels (2x back, front middle, 2x front side, 2x back side) approximately in accordance with the pattern above to make the front flap (about 60 cm to start, trimmed later to about 50 cm) and rear tails (about 75cm to start, trimmed later to about 68 cm), and an extra front middle so both halves of the bosom have something to attach to. It is REALLY important to note that the left side of Moxxi's jacket (when you're wearing it) is cut lower than the right - hence why you can only see her panties on the right. Also, I made everything a little longer/wider than it needed to be, so I could trim to need once the jacket was together - remember, it's easier to trim down than add on! With everything cut out, I sewed the lower section of the jacket together leaving it open where necessary, then sewed the bolero directly to the lower section - and voila! The shell of a jacket!

While cutting out everything above, an intelligent person would make duplicates of each piece in the liner material to ensure that both have the same shape and size, but again, I am an idiot. Instead, I decided I needed this after the fact, and had to approximate the pieces from the completed jacket outer. Put it all together in the same manner as with the jacket above, and voila! A jacket liner!
The jacket liner
So many pins... So many fingers pricked.
At this point, you're going to need either some assistance, or a dressform identical to your body.  I opted for the assistance route, and had my friend Fatima over to help tailor and shape the jacket. She was actually priceless over the final few days of work, acting as a second set of hands to complete all the straight forward tasks like pinning bias tape and sewing on buttons while I worked on all the painting and detailing stuff - Love you Fatima!

Shaping was a bit of a process as jacket is very form fitting and needs to sit at specific spots. As I was planning on wearing shapewear and a specific bra, I made sure I was wearing them at this point so the jacket was made to fit with what I was actually planning to wear. The bust line needed to be cut down quite a bit to make the necessary cleavage, and the tails, hips and front panel all needed to be trimmed to form. In the end, I think I STILL hadn't trimmed the hips high enough or the front panel short enough, but I was still happy with the look.

That's the basics of the jacket! With the outer and liner both together and fitting correctly, it's time to PAINT! Next time, we'll talk about the magic formula for painting stripes!

In case you missed it... Moxxi Part 1 - Spats!

Wednesday, 5 June 2013

Time Management and Dr. Zed Part 2 - Flask Pocket and Shoulder Armour

As I'm typing this, (between deaths in a Gears of War 3 multiplayer match) I'm reminded of how much it sucked not being allowed to play video games while I was working on these costumes.  I started planning well enough in advance, started making purchases and getting stuff together in about February, but as for actually getting to work, well.... Let's say it was a little delayed.  I made the spats in March, but didn't get back to work until April 21st if my camera's date stamp is to be believed - I just kept having excuses not to! Needing this thread or that thread, friends visiting, having to go visit family, you name it.  

With our selected day for hitting Comiccon being May 11th, I had 20 days to make two costumes pretty well from the ground up... In addition to having to continue working my full time job and two part time jobs. It was about that point where I decided that I needed to initiate a full gaming ban. Instead of coming home after a 12h shift and picking up my controller, I had to come home and hit the sewing machine.... As much as I enjoy sewing and creating... I enjoy gaming too! And having a time crunch always makes things less enjoyable. The only time I was even allowed to turn on my XBOX was to fill in the blanks in my reference pictures - that was it, and it was horrible!  I watched movies in the background, but it's just not as relaxing as gaming.


Shoulder armour and flask pocket!
"If you ain't dead, I'll keep you that way!"
I digress, the moral of the story is - don't wait until the last minute to get to work on your cosplays! Not only does gaming again feel sooooo goooood, but I purchased the first few things for my next pair of cosplays TODAY! Now to see how long I take to actually get to work ;)

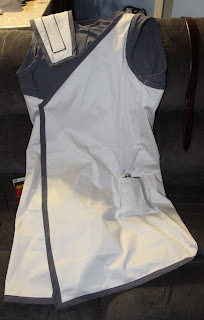
So with the smock together, it was time to worry about the details.  I ordered all the buckles and whatnot off etsy through Everything Ribbons, but while I was waiting for them, I figured I'd get to work on everything else! In this case, the pockets and the armour piece for the shoulder.

Materials necessary:
-The same material and bias tape used in the rest of the smock
-A small piece of thick material to thicken the armour (I used polar fleece)
-A flask
Dr. Zed's flask pocket reference
Two angles for bonus understanding!
The flask pocket, complete with mini pocket on the front, I did pretty well from instinct.  I grabbed the flask that the hubby would be using for the costume, and laid it out to make a pattern.  The important things to note are - The angle at which the pocket comes down from the smock to the front of the pocket, the proportion of the smaller pocket to the larger pocket, and the angles on the smaller pocket's flap. I came up with the pieces below:
Flask pocket and mini-pocket
Be warned, this was a little while ago, I should have taken more pictures, and my descriptions might not make sense to anyone but me.... I think I ended up separating the flap from the small pocket "front" so the pocket would be functional, but it would be entirely possible to leave it as one piece.  From there, I made very small seams (like, 2mm) around the edges of the small pocket flap and the top of the small pocket front. I think I sewed the flap on to the large pocket first (just have it in "flipped up" position and sew along the bottom edge) then placed the pocket front just under the flap, folded the excess fabric underneath, and sewed around the sides and bottom.  A zap of steam from the iron holds the flap in the "flipped down" position, and the front pocket is complete!  On to the big pocket!

Flask pocket complete!
Zoom'd for effect
Next, I hemmed the top of the big pocket, though the angles make it a wee bit awkward. Because there's a seam in the pocket itself (from the corners on top, around the bottom of the small pocket) I went ahead and did the same by folding the fabric outward (outer side folded together) along the line I wanted to create, and sewed the fold in place as close to the edge as possible (stitching on the inside of the pocket).  If you don't feel like going that crazy, you can always just draw it on, as I ended up cell shading it later anyway.  Finally, place the pocket where you want it on the smock, fold the excess under, and sew it down! Voila, a pocket success! To make the flask sit as high in the pocket as Zed's, I just shoved some scrap fabric in the bottom, easy peasy.


Shoulder armour, front and back
What up, re-used pic?
The armour piece came next!  I call it that because it looks thick and possibly tough, just like armour. I REALLY didn't take any pics of this step... Oops.  I started by measuring my model, both for the length and approximate width of the piece, over his shoulder (41cm), across his shoulder (18cm), etc.  Then I sketched out the shape based on the measurements on a piece of fabric. Once I had a satisfactory looking shape and size, I cut it out, went back to Julian, stuck him back in the smock and draped the piece it over his shoulder to see if the proportions were correct - it appeared to be perfect!  So I traced it on the fabric to get an opposite, and cut a third piece out of my polar fleece to use as the "thickening" interfacing, then layered them with the two beige pieces on the outside and the polar fleece piece on the inside.  I stitched quickly around the outside to keep the three pieces together, then sealed the edge in with bias tape. The bias tape may act funny due to the thickness of the piece, but just make sure it looks right on the "up" side.
Dr. Zed's shoulder armour pattern
It looked a little something like this! With measurements and all! (Sorry for the metric stuff... Canadian)
Next came the "stripe" that goes on top of the piece.  I approximated the width and length based on the width and length of the armour piece (30cm x 4cm), adding a little bit for seam allowance. Then I grabbed some of my thinnest pre-made bias tape,  folded in the edges of the beige strip, and pinned the bias tape to the back (allowing just a little to peek out) to hold the fold and attach the bias tape.  A quick zip around the outside on the sewing machine, and I was ready to attach the strip to the armour piece!

Now, here's the voice of experience coming out on upsides and down sides.  You can never
Dr. Zed's smock, all together!
Another re-use, but yay! All done!
check too many times to make sure you have it right, and ensure that you're not falling prey to "mirror syndrome," ie. thinking that something is on the opposite side because that's what you would see in a mirror.  I was so sure I had the strip on the correct side (judged by where the round edge vs the square edge sit on the back of the armour piece) but sure enough, I sewed it on the wrong darn side.  I could have left it that way, surely no one would have run up and said "The curve should be pointing inward, OMG LOLOLOL!" but I just couldn't leave it, so I got to work un-picking all my darn stitches just to sew it back on the other darn side... and wrote BAD in big, capital letters on the wrong side before I had the stripe off to ensure I wouldn't make the same mistake twice. Sew the stripe directly along the same seam that was used to stitch the bias tape to the beige fabric to avoid extra seams, and you'll have your very own shoulder armour piece!


Et voila! Your smock is as ready as it can be before the buckles come into play!  I think I made Julian try it on like, 20 times over the course of its construction, but damned if it doesn't fit him like a glove.  I LOVE how well it came together, and even more when the rest of the details were added! But since I was stuck waiting for  my buckle-mail, I finally got back to my costume - as such, next time, Moxxi part 2 - Beginning the Jacket!

Just in case you missed it.... Dr. Zed part 1 - The Smock!