 |
| So much fun, right? |
So, I had been planning on talking about the bias tape and such in this post, but since I didn't take pictures at the time, I was planning on doing a little mock-up for this and that to make sure I can get my point across accurately. So instead, I'll write all about the cuffs and collar!
 |
| Today's targets... |
Cuffs -
- Black and white striped fabric
- Medium weight fusible interfacing
- Fabric paint (blue and white)
- Black fabric marker
Collar -
- White fabric (I used the same lightweight denim as in the spats)
- Heavy weight fusible interfacing
- Painter's tape
- Fabric paint (for the collar I used acrylic fabric medium, and acrylic paints - black, blue, and white)
 |
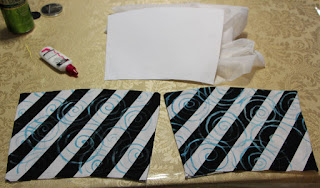
| Paper cuff, fabric cuffs! |
 |
| Fabric marker - no use on black! |
I used fabric paint for the swirls (you can see the little tube of tulip in the picture) mixing white and blue. I'm mostly happy with how they turned out, they're just sketchy enough, but still have presence - that said, the thickness of the paint made it difficult to keep the swirls even in colour. I also experimented with blue fabric marker, but it didn't show up on the black parts at all. Once I discovered the fabric medium, I knew acrylics would have done a better job, and that is what I ended up using on the collar.
Attaching the cuffs to the sleeves took way more brain power than I had to give the day I did it... It was one of those days where I was just exhausted and should have been in bed, but instead, I was determined to get that one last thing done, and found myself sitting at my sewing table thinking "If I put it like this, then flip it... wait... If it's like this while inside out then... no... wait..." ...serious issues trying to think. Anyway, what actually DID work is - I turned the jacket inside out, then pinned the cuff on with the outside facing outward, and sewed it as though it were an extension of the sleeve. I also took care to ensure that the opening (where the cuff comes together when flipped) faced away from the body with the front overlapping the back, then sewed the cuff closed to the point as shown in the references.
 |
| I think it looked like this! |
 |
| Making sure the two sides match... |
 |
| Sketch it on, tape it up, and paint, paint, paint! |
 |
| Swirls in place and ready to go - I like collar's better than cuffs |
 |
| Swirls touching liner, pin in place, and sew on! |
Miss anything? Moxxi Tutorials so far:
Part 1 - Spats
Part 2 - Finding Fabric and Starting the Jacket
Part 3 - Jacket continued, Stripes and Zipper


No comments:
Post a Comment