With our selected day for hitting Comiccon being May 11th, I had 20 days to make two costumes pretty well from the ground up... In addition to having to continue working my full time job and two part time jobs. It was about that point where I decided that I needed to initiate a full gaming ban. Instead of coming home after a 12h shift and picking up my controller, I had to come home and hit the sewing machine.... As much as I enjoy sewing and creating... I enjoy gaming too! And having a time crunch always makes things less enjoyable. The only time I was even allowed to turn on my XBOX was to fill in the blanks in my reference pictures - that was it, and it was horrible! I watched movies in the background, but it's just not as relaxing as gaming.
 |
| "If you ain't dead, I'll keep you that way!" |
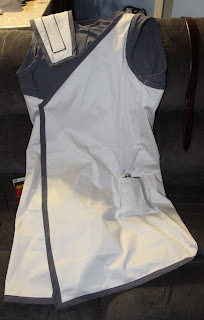
So with the smock together, it was time to worry about the details. I ordered all the buckles and whatnot off etsy through Everything Ribbons, but while I was waiting for them, I figured I'd get to work on everything else! In this case, the pockets and the armour piece for the shoulder.
Materials necessary:
-The same material and bias tape used in the rest of the smock
-A small piece of thick material to thicken the armour (I used polar fleece)
-A flask
 |
| Two angles for bonus understanding! |
Be warned, this was a little while ago, I should have taken more pictures, and my descriptions might not make sense to anyone but me.... I think I ended up separating the flap from the small pocket "front" so the pocket would be functional, but it would be entirely possible to leave it as one piece. From there, I made very small seams (like, 2mm) around the edges of the small pocket flap and the top of the small pocket front. I think I sewed the flap on to the large pocket first (just have it in "flipped up" position and sew along the bottom edge) then placed the pocket front just under the flap, folded the excess fabric underneath, and sewed around the sides and bottom. A zap of steam from the iron holds the flap in the "flipped down" position, and the front pocket is complete! On to the big pocket!
 | |
| Zoom'd for effect |
 |
| What up, re-used pic? |
 |
| It looked a little something like this! With measurements and all! (Sorry for the metric stuff... Canadian) |
Now, here's the voice of experience coming out on upsides and down sides. You can never
 |
| Another re-use, but yay! All done! |
Et voila! Your smock is as ready as it can be before the buckles come into play! I think I made Julian try it on like, 20 times over the course of its construction, but damned if it doesn't fit him like a glove. I LOVE how well it came together, and even more when the rest of the details were added! But since I was stuck waiting for my buckle-mail, I finally got back to my costume - as such, next time, Moxxi part 2 - Beginning the Jacket!
Just in case you missed it.... Dr. Zed part 1 - The Smock!


No comments:
Post a Comment